DEMU Showcase 2014, Burton on Trent

Well it’s been and gone again … And once again I kinda really didn’t see much of the show as I was Managing the ” Pre-Owned/Loft Insulation Products” Stall. :o).

See the Define blog posting for a flavour of what else happend over the weekend …

http://definemodellers.wordpress.com/2014/06/02/demu-showcase-2014/

All in all a great weekend was had and I managed to see lots of friends and chat to most, no matter how fleetingly over the two days …

Next year I’ll have more time – Famous last Words there !!

Posted in Uncategorized | Leave a comment

What a long time it’s been… Sorry about that!

Hi All.

Sorry I’ve been away from here for so long . . . . I can’t even really say that I’ve done that much specific Broomleigh based modelling, just lots of research and plan printing . . . . Along with the construction of the 1st 10 feet of baseboard for the layout.

I will endevour to make ammends once the DEMU showcase is over ( Burton Town Hall – Saturday May 31st – Sunday June 1st ).

A warm welcome to the new followers from all of us here at Broomleigh …

TTFN.

Posted in Uncategorized | Leave a comment

Heading in the right direction?

The use of files and some Wet 'n' Dry paper allows you to rectify the errors on the Heljan Class 33/0 roof dome relatively easily and quickly.

The use of files and some Wet ‘n’ Dry paper allows you to rectify the errors on the Heljan Class 33/0 roof dome relatively easily and quickly.

For sometime now I have really been meaning to attack my small fleet of Heljan 33’s that I have.

The error on the roof dome of the 33/0’s caused quite a stir on many Web Forums when the models came out.

Many Folk saying that it was such a major mistake and it would preclude them from buying it unless it was fixed.

Well it wasn’t fixed by Heljan and the models have seemingly sold well enough.

A bit of ‘Modelling’ time spent on these models soon resolves the problem and with Heljan using the same Paint shades as Howes Railmatch achiving a almost perfect match isn’t hard either, it really doesn’t matter either if you are about to add some ‘weathering’ as the Roof Dome area on 33’s seemed to get covered reasonably uniformly in a Dark Grey/Black matt mess… so a suitably matched colour would also do to repair/replace the Factory applied finish.

The picture above shows the final rubbed down finish to the roof dome after a gentle application of the file to remove the odd ‘lines or ridges’ in the sanded area.

This took around 20 mins per end to get to this stage, so if you only have a hour or so a corrected model is easly achievable.

Therefore, If this area on your model ‘bugs’ you, get your files and ‘wet & dry’ paper out whilst watching ” Corrie” or “X-Factor” and get modelling!

After all we are supposed to be Modellers, aren’t we??

Posted in Uncategorized | Leave a comment

Another Week, Another Project

I wonder if you can guess at what it will become ?

I have collected together all the required parts to construct a TLV to work with my Bachmann MLV.
Just needs some work with a knife and drill on the ends and a re-number now.

Shouldn’t be to long for this one.

Posted in Uncategorized | Tagged , , , , , , , , , , | Leave a comment

Generating Interest for 2013

Although these models are not part of my collection I was part of the modelling side of the project … The two BG’s came first and EWS 6313 was originally part of an idea to produce a correct VSOE model train formation. then after a Railtour BR Blue 6311 became the other half of the first pair of Generator Van conversions.

The base models were Bachmann BG’s and the modifications were added from Some Aluminium Tubing, for the exhaust ports for the Generator and Evergreen plastic sheet, Pack # 4040.

The BG’s have had a set of twin doors completely removed and replaced by a full body hieght grille for the generator radiator and clean air intake. Therefore the whole side is cut down the unrequired door lines and the door molding is completely removed and replaced with a replacement section from the Evergreen sheet. Also needed are a pair of Fuel tanks mounted under the sole bar and a hand brake wheel added underfloor in line with where the original internal Upstand gearbox would be.

Bachmann BG Conversion to Rail Charters BR Liveried Generator Coach 6311

Bachmann BG Conversion to Rail Charters BR Liveried Generator Coach 6311

Once all the replacement construction has dried, is solid and primed the top colours were airbrushed over and the transfers were added to complete the Models.

RJ6313a

After these two models had been completed we noticed that there was a neat conversion with a BSK which had been fitted with a generator so it was decided to make this the next model to convert.

Based on a Maroon Bachmann BSK the model has grilles added to both sides, however, these are of differing sizes and are fitted into a frame that then fits into the gap where the pair of Brake Van doors were removed.

In modelling terms this meant some carefull study of the collection of prototype pictures taken at Victoria and making up the outer frame panel from thin plastikard and then adding the ‘grille’ into the hole inside this panel and attaching it to the model. A set of small fuel tanks with a representation of the Gauge was added to the Underframe at the same time.

A Conversion of the Bachmann BSK model to produce Generator fitted Maroon liveried 35469.

A Conversion of the Bachmann BSK model to produce Generator fitted Maroon liveried 35469.

It was thought that a pair would be a good idea so whilst making the original model, another BSK was purchased and the second Psuedo numbered BSK model was produced and this was numbered 35468…

Bachmannn BSK conversion to a Psuedo 35468 Generator Coach for railtour use.

Bachmannn BSK conversion to a Psuedo 35468 Generator Coach for railtour use.

Both models were primed and then given a couple of top coats of Railmatch Coaching Stock Maroon, which is a suprising close match to the Bachmann maroon finish and well within the range of colour variance you find in real life. 

Whilst these models were finished off last year they will lead the way forward for at least one NR Yellow Generator BG, which will form a modelling project for this year ….

Posted in Uncategorized | Tagged , , , , , , , , , , , | 1 Comment

End of Year Posting

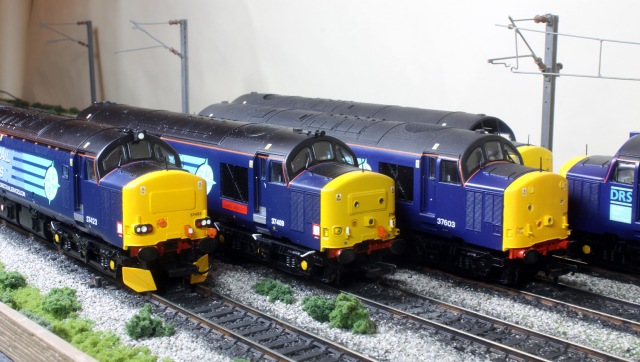
Shown here are 3 Bachmann Class 37 models, Two are the Model Rail Limited Edition, and one is a compleat repaint. Two feature PHDesigns replacement resin noses. 37423 features the correct Nose and Top Headlight, 37409 is the Std Model Rail Item and 37603 is a Std Bachmann Refurbished 37 with PHDesigns replacement noses and Lancaster City Models Waterslide DRS logo Transfers.

Shown here are 3 Bachmann Class 37 models, Two are the Model Rail Limited Edition, and one is a compleat repaint. Two feature PHDesigns replacement resin noses. 37423 features the correct Nose and Top Headlight, 37409 is the Std Model Rail Item and 37603 is a Std Bachmann Refurbished 37 with PHDesigns replacement noses and Lancaster City Models Waterslide DRS logo Transfers.

Well 2012 is about to draw to a close and it’s been a “interesting” year for me …

Not enough time to do most of the modelling that I wanted to do, but the DRS 37’s have all made it to the finished state, 37604 is the last, and I’m adding the Extreme Etchings Window Frames & Lazerglaze this afternoon.

I have had difficulty getting to Define meetings during the second half of the year due to the rest day pattern.

However all this has changed and will change again in the Spring, so here’s hoping for some better access to the Brunswick to be with ‘The Lads’

Time for a “Show and Tell” to finish the year off ….

Enjoy!

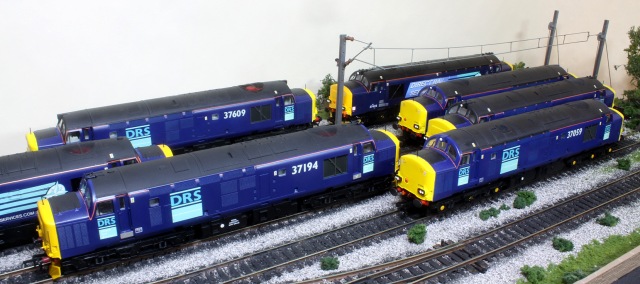
More Std Bachmann 37/0 and Refurbished 37 Models That have been Repainted and fitted with PHDesigns replacement resin noses to get the correct light arrangements on the ends. Here we have ( L - R, B - F ) 37609 and 37423. 37603 & 37069. 37194 & 37259. Finally 37059 at the front.Again all are finished with the excellent  Lancaster City Models DRS logos.

More Std Bachmann 37/0 and Refurbished 37 Models That have been Repainted and fitted with PHDesigns replacement resin noses to get the correct light arrangements on the ends. Here we have ( L – R, B – F ) 37609 and 37423. 37603 & 37069. 37194 & 37259. Finally 37059 at the front.
Again all are finished with the excellent Lancaster City Models DRS logos.

Last one for 2012 ……………….

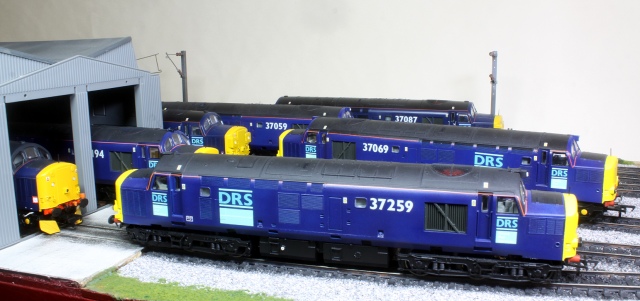
37259 & 37069 sit outside the as yet unfinished Shed on my small display layout, surrounded by a brace of other DRS repaints done this year. Can you tell that we like 37's !!

37259 & 37069 sit outside the as yet unfinished Shed on my small display layout, surrounded by a brace of other DRS repaints done this year.
Can you tell that we like 37’s !!

So joining the Bachmann Produced Limited Edition DRS 37’s of 37038/409/510 & 688, we have Repainted and Re-Nosed 37059, 37069, 37194, 37259, 37423 ( new nose & renumbered only ), 37603, 37604, 37609 & 37611.

37087 has also been added to the ‘Fleet’, but this is just a re-number/ nameplate added conversion of a 37038 Limited Edition …

A big ‘Vote Of Thanks’ to my Modelling Pal, Richard J, for being the other half of the ‘Workforce’ and being the “Decal Demon” again in this Project … Cheers Matey!!

“Enough DRS?” You say -Naaahhhhh! :o.

Happy New Year to all Readers .. See you on the Flip Side ( 2013 ).

Posted in Uncategorized | Tagged , , , , , , | Leave a comment

I can see clearly now ………..

Just a quick post to show the pre production Laserglaze windows for the Lima/Hornby Class 73 Locomotives.

The Striped loco on the far left has the original Glazing in the front, the Fragonset Liveried 73107 has a ‘dimension test cut’ added and 73212 has a completed ‘test set’ with the edges given a run round with a black permenant marker pen to hint at the rubber beading that hold the real windows in.

There will be an etch for the roller blind front plate coming soon(ish) to allow a prototypical blind box to be added behing the central cab front window.

All in all a superb addition to the Laserglaze range …. available soon from Brian @ Shawplan ( Hopefully the Nottingham Show, this weekend ).

More soon ……………………..

Posted in Uncategorized | Tagged , , , , , , | 1 Comment

A Bakers Dozen…………

Hornby have in the past couple of years really looked and made a reasonable attempt at bring the high standards from it’s Loco and Coach models into the world of Wagons – Unfortunately they have also brought the same silly mistakes across too.

Take the model of the CLAM for instance ( released at the same time as the RUDD and TOPE as they all came from the same 21T hopper prototype ). It looks great and matches the other wagons excellently, but it’s silly niggle is that Hornby have made it’s body over 2mm too wide, which is such a shame.

At the time of release, I decided to partake of a bulk buy deal from a well known NW Box shifter, before I realised that there was an issue over the width.

The main reason for the purchase was to try to get a rake of well detailed models with out having to spend ages painting a yellow stripe around all the bodyside uprights on the excellent Parkside kits.

I took to a “sackcloth and ashes despondancy” once I realised I had a dozen ‘pups’ sitting on my project shelf, and returned to adding coat after coat of yellow to my Parkside kits.

A discussion at one of the model railway shows about ways of ‘Frankestiening’ a decent model from the Hornby and Parkside parts resulted in another single wagon purchase and it’s dismemberment at the show and the combined groups ‘grey matter’ was applied and an idea formed to cut off the Hornby side and mount it on a Parkside kit to try to mitigate the width and painting issues.

This again stalled when the Blue biased Engineers Grey colour that Hornby have used was found to be way off from any other manufacturers colour and model paint supplier and proved impossible to match.

Then the annoucement that the Humbrol Authentic Railway Colour paint range would be rejuvinanted and include matches with the colours that Hornby had recently be appling to it’s latest models.
“Yes! Forward movement at last” I thought, so out came the saw and the sides chopped off.

I then decided to have a look at using just the Horby parts to get a correct model.
The chassis tub was sanded down equally on both sides and the side re-attached, the end detailing frame that had been removed to enable the side to be cut off had the outher end posts removed and the outer horizontal frames shortened on each side and then re-attached.

Original Hornby model on the left, Parkside kit on the right with the 'thinned' Hornby model upside down on the top showing the overwidth of the original base model.

 
Out came the Humbrol Authentic Railway Colour Engineers Grey, shaken, stirred and shaken yet again, the pot opened and the brush dipped to touch up the cut marks.

“Hmm this looks a little light”, I thought “but hey, acrylics do dry a little darker”
Unfortunately – Not this time!

Original Hornby Model on the right and 'thinned' Hornby model on the left with the 'alledged' Colour matching paint from Humbrol applied.

So All I have to show is a thinner Hornby model, but still a long journey on the painting front as I have re-paint the whole damn model again ………..

More soon ………………….

Posted in Uncategorized | Tagged , , , , , | Leave a comment

One Down, a few down …………….

Well this week has seen a few small jobs and a few big jobs starting to come to an end…….

The CRABs are starting to get the end foot steps which will allow this rake to be finally finished off.

The DRS 37 Project has rolled out it’s first loco, 37259.  I’ve just noticed that we have forgotten the nose antenna, so back she will go to gain this in the next day or so. Some White plastic rod is also needed in the roof mounted light over the cab, but that needs to be sourced as nothing suitable is currently in stock.

The other 4 in this first batch of 5 are all just bubbling under and should all be completed in the next week or so.

More soon ……

Posted in Uncategorized | Tagged , | 1 Comment

Blowing the dust off ……..

…………….some “on hold” projects this weekend.

First up will be glazing and screwing the roofs down the GLV conversions I did in 2010 … Might hack off the masive Lima Tension lock too at the outer ends ..

Sort out the decaling of this model of SATLINK LM liveried KDB 950155, it’s converted from a Hornby model and has had a wieght box added to the Underframe, over panelled bodysides and replacement handrails added. Looking at the Picture, those molded Buffers and draw hook will have to go too …

My Chivers “CRABs” need to have the lower ‘Stirrup’ style foot steps added .. complete with joggle !

I still have another DACE to build too ……..  

And I may have a crack at sorting out the 8 shoe braked conversions of the Chivers CRAB too .. or maybe not !

Happy modelling, More Soon ……….

Posted in Uncategorized | Tagged , , , | Leave a comment